Implementing Multinomial Logistic Regression with PyTorch
I’ve recently started using PyTorch, which is a Python machine learning library that is primarily used for Deep Learning. I find the API to be a lot more intuitive than TensorFlow and am really enjoying it so far. I figured writing some tutorials with it would help cement the fundamentals into my brain. If you’re interested in learning more, I highly recommend Deep Learning with PyTorch. The majority of my current knowledge came from there. :)
Table of contents:
- Overview
- Why Logistic Regression?
- Logistic Regression as a Neural Network
- Fundamental Concepts and Implementation
- Free Differentiation with PyTorch’s Autograd
- Using the PyTorch Neural Network Package
Overview
This post will cover three different ways to implement Multinomial Logistic (Softmax) Regression. The first will implement all of the necessary steps with basic PyTorch tensor operations, while also explaining the core concepts. Then we’ll learn how to use PyTorch’s Autograd to get gradient calculations for free, because who has the patience to calculate derivatives by hand outside of the classroom? Lastly, we’ll implement it with all of PyTorch’s bells and whistles.
To make things as easy as possible we’ll use the famous Iris dataset. The CSV can be downloaded
here but is also available in the data folder of my accompanying
notebook repository.
In the Fundamental Concepts and Implementation section I’ll try to explain things in a few different ways: Equations, code, and plain english.
Note: We’ll skip over some really important parts of a model development workflow. The main purpose of this post is to show how to do the most fundamental steps with PyTorch.
Why Logistic Regression?
Logistic Regression is an incredibly important machine learning algorithm. It’s very efficient and works well on a large class of problems, even if just as a good baseline to compare other, more complex algorithms against. Despite the confusing name, it’s used for classification tasks, not regression. As a reminder, classification deals with predicting discrete categories (e.g., whether an image contains a cat or dog), while regression is used for predicting continuous values (e.g., tomorrow’s stock price). Softmax is the generalized version of Logistic Regression in that it allows us to predict an arbitrary number of mutually exclusive classes instead of just two.
There’s at least a couple of ways to describe this model. The classical method is to explain it in terms of odds ratios, conditional probabilities, and maximum likelihood estimations. This comes from the algorithm’s roots in statistics. While I believe having this understanding helps with intuition and model explainability, I think it’s considerably easier to learn it in terms of neural networks. That being said, we’ll be using the latter method.
Note: From this point on I’m mainly going to refer to multinomial logistic / softmax regression as simply logistic regression. While technically incorrect (logistic regression strictly deals with binary classification), in my experience this is a common convention.
Logistic Regression as a Neural Network
Logistic Regression can be thought of as a simple, fully-connected neural network with one hidden layer. The diagram below shows the flow of information from left to right.
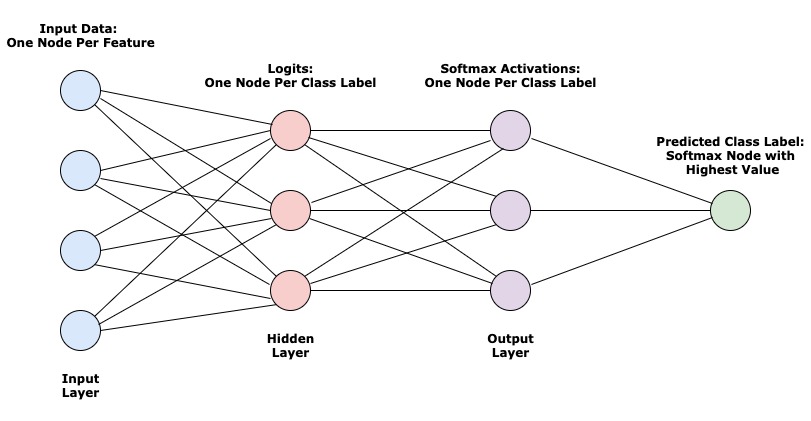
Let’s walk through what’s happening here:
- You start with some input data (cleaned and pre-processed for modeling). This example has 4 features/columns, represented by 4 nodes (also referred to as neurons).
- Each feature of the input data is then mapped to every node in the hidden layer.
- The nodes here are floating point numbers that can be referred to as
logits. They’re the result of multiplying every input feature by a set of weights that are unique to the node. - More info in the Linear Model section.
- The nodes here are floating point numbers that can be referred to as
- The logits then get transformed one more time by being passed through an activation function. The results are numbers
between 0 and 1, where each node represents the probability that this observation/row in the data has the label/class
that the node represents.
- More info in the Activation section.
- Lastly, we pick the node in the output layer that has the highest probability and choose that as the predicted class label.
One iteration of the model training process for a network like this can be split up into two sections - the forward pass and backward pass.
Forward Pass
The forward pass in this network is the first three steps in the diagram above, starting with the input layer and ending with the activations (output layer).
Using the activations, we calculate the model’s current performance (known as training loss) using a cost function. More on this in the Cost Function and Regularization section.
Backward Pass
Using the training loss, we go back through the network and make adjustments to every hidden layer’s parameters. This should reduce the loss in the next training iteration. In the case of Logistic Regression, there’s only one layer of parameters that will get adjusted. This process is detailed in the Update Model Parameters with Gradient Descent section.
Fundamental Concepts and Implementation
Imports
import pandas as pd
import torch
from torch import Tensor
At the time of this writing my package versions are pandas=1.0.1 and torch=1.4.0.
Get the Data Ready
The Iris dataset describes 3 types of iris plants, Iris Setosa, Iris Versicolour, and Iris Virginica, by 4 different
features, sepal length, sepal width, petal length, and petal width. There’s 50 observations each for a total
of 150.
The first thing we need to do is get the input data into a format suitable for machine learning.
data = pd.read_csv("./data/Iris.csv").drop("Id", axis=1)  # 1

X_numpy = data.drop("Species", axis=1).values  # 2

target_map = {
    val: index for index, val in enumerate(data.Species.unique())  # 3
}
y_numpy = data.Species.map(target_map).values  # 4

X = torch.tensor(X_numpy, dtype=torch.float32)  # 5
y = torch.tensor(y_numpy)
- Read CSV into a Pandas
DataFrame. - Get the feature array by removing the
Specieslabels. - Create a dictionary that maps the species string to a unique integer.
- Map the
Specieslabels from their string representation to an integer. - Convert the features and labels into PyTorch tensors.
Class Labels
>>> target_map
{
    'Iris-setosa': 0,
    'Iris-versicolor': 1,
    'Iris-virginica': 2
}
One-Hot Encode Class Labels
A common way to represent multinomial labels is one-hot encoding. This is a simple transformation of a 1-dimensional
tensor (vector) of length m into a binary tensor of shape (m, k), where k is the number of unique classes/labels.
Each column in the new tensor represents a specific class label and for every row there is exactly one column with a 1,
everything else is zero.
Here’s a concrete example:
This is an important technique for preprocessing certain categorical features in your training data as well. For this use case it just makes some computations easier.
def one_hot_encode(vector):
    n_classes = len(vector.unique())  # 1
    one_hot = torch.zeros((vector.shape[0], n_classes))\
        .type(torch.LongTensor)  # 2
    return one_hot\
        .scatter(1, vector.type(torch.LongTensor).unsqueeze(1), 1)  # 3

y_one_hot = one_hot_encode(y)
- Get the number of unique values in
y. - Create a tensor of zeros with shape
(n_training_samples, n_classes). - Use the
scattermethod to replace zeros inone_hotwhere there should be a 1 to represent that a given row is of the specific iris type.- The first argument is the axis along which to work, which in this case is
1for the second dimension (across rows). - The second argument supplies indices that represent the column in each row that will get a 1. The trick here is that we already encoded the Iris labels with integers 0, 1, and 2, which happen to also specify valid columns.
- The last argument is the value(s) we want to impute, which in this case is just 1 for every row.
- The first argument is the axis along which to work, which in this case is
Create Train and Test Sets
random_indices = torch.randperm(X.shape[0])  # 1

n_train = int(0.8 * X.shape[0])  # 2
X_train = X[random_indices[:n_train]]  # 3
y_train = y[random_indices[:n_train]]
y_train_one_hot = y_one_hot[random_indices[:n_train]]

X_test = X[random_indices[n_train:]]  # 4
y_test = y[random_indices[n_train:]]
y_test_one_hot = y_one_hot[random_indices[n_train:]]
- Create a shuffled list of integers from 0 to
X.shape[0](150) - Set the number of training examples as 80% of the number of rows.
- Subset
Xwith ann_trainsized slice ofrandom_indices. - Subset
Xwith the rest ofrandom_indices
Linear Model
The first step of the model requires multiplying each m rows (training examples) of the dataset by a weight matrix
with n rows and k columns, where n is the number of columns in your dataset (features) and k is the number of
unique classes/labels you’ll want to predict. In addition to the weight matrix we’ll add a bias term to each column of
the result.
These operations are implementing this equation:
Where,
In logistic regression terms, this resulting is a matrix of logits, where each is the logit for
the label of the training example.
To put these things in terms of the Iris dataset, our n will be 4 for the sepal length, sepal width,
petal length, and petal width features. k is 3 for for the Setosa, Versicolour, and Virginica
classes. And although there’s 150 total observations/rows, our training size m will be (somewhat arbitrarily) 120,
or 80% of the data.
Initialize Model Parameters
Create two random tensors with values uniformly distributed between 0 and 1:
w = torch.rand((4, 3))
b = torch.rand(3)
>>> w
tensor([[0.2796, 0.1976, 0.3208],
        [0.7487, 0.3949, 0.4665],
        [0.2918, 0.6943, 0.9894],
        [0.5497, 0.1376, 0.7568]])

>>> b
tensor([0.6119, 0.7690, 0.1274])
Note: You can combine the weights and bias vector into one tensor if you append (or prepend) a column of ones to
the data (X) tensor. Personally, I prefer to keep them separate so it’s more clear.
Activation
After generating our matrix we want to turn it into something that we can interpret as probabilities. For this
we’ll use the Softmax activation function (hence the name Softmax Regression).
Where,
In plain english, we take the exponential of every element in and then divide every element by the sum of its row.
This means that every value is between 0 and 1 and each row sums to 1. We can refer to this result as the activations.
For our data, will correspond to the probability that iris observation is of the type
(recall that we encoded Iris types Setosa, Versicolour, and Virginica into 0, 1, and 2, respectively).
Define Softmax Function
def softmax_activation(z):
    exponentials = torch.exp(z)
    exponentials_row_sums = torch.sum(exponentials, axis=1).unsqueeze(1)  # 1
    return exponentials / exponentials_row_sums
- The
unsqueeze(1)method call here expands thetorch.sum(exponentials, axis=1)tensor of row-wise sums into two dimensions so the division can happen.
Run Model
Forward Pass Through the Model
Z = torch.mm(X, w) + b  # 1
A = softmax_activation(Z)
- Matrix multiplication of
Xandwwithtorch.mm.
Cost Function and Regularization
Cross Entropy Loss
The cost function is how we determine the performance of a model at the end of each forward pass in the training
process. For multinomial classification Cross Entropy Loss is very common.
Note: Technically, the loss refers to the accuracy of a single observation prediction while the cost is the
average loss of all m predictions. In practice it’s typically just referred to as loss.
L2 Regularization
Regularization in general refers to methods that try to prevent overfitting in machine learning models, where overfitting means that the model has learned too much “noise” in the training data and won’t generalize as well to unseen examples. In practice you can tell you’re overfitting the data when your training loss continues to go down while loss on a validation data set stands still or goes up.
L2 Regularization simply adds a term to the cost function intended to penalize model complexity. It looks like this:
So we simply square every parameter in our weight matrix and take the sum. This is where the idea of penalizing complexity comes from - the sum gets bigger as the magnitude of individual parameters or the number of them grows. That being said, adding this term to your loss calculation has the effect of encouraging your model parameters towards zero.
Note: In general, you want to pre-process the features in your dataset to be of the same scale, but this is especially important when using L2 regularization.
Where is a hyperparameter to be tuned and is equivalent to vanilla Cross Entropy Loss.
Define Cross Entropy Function and Evaluate Loss
def cross_entropy_loss(y_one_hot, activations):
    return -torch.mean(  # 3
        torch.sum(  # 2
            y_one_hot * torch.log(activations), axis=1  # 1
        )
    )
There’s a lot of method calls here so let’s break it down.
- Multiply the one-hot labels by the log of the activations. It’s important to note here that only one column per row in the product will be non-zero.
- Get the row-sums (
axis=1) of the tensor in step 1. - Return the negative mean of step 3.
l2_regularization = torch.sum(w ** 2)
lambda_param = 0.01
loss = cross_entropy_loss(y_one_hot, A) \
       + lambda_param * l2_regularization
Update Model Parameters with Gradient Descent
This is where the magic of machine learning happens.
In order for us to end up with a model that can make accurate predictions, we need to find a way to measure what impact each parameter has on the average loss. Using this information, we can iteratively adjust those parameters such that the loss gets smaller and smaller. In other words, we want to find the parameters that minimize the cost function. The algorithm for doing this is called Gradient Descent.
Earlier in this post we initialized and randomly. As is these model parameters will lead to very poor predictions so at the end of each iteration we’ll perform these steps:
- Get the
gradientof each model parameter.- The gradient is the partial derivative of the parameter at its current value with respect to the cost function at it’s current value.
- The algorithm for computing these gradients is called
backpropagation.
- Update each model parameter in the opposite direction of its gradient.
- The gradient is a measure of the impact that a parameter has on the cost function. implies that the cost is increasing while means it’s decreasing.
- Because we’re trying to minimize the cost function, we adjust the parameter in the positive direction when and the negative direction when .
- An important hyperparameter here is the
learning rate. This determines how big of a “step” we make in the parameter update. - The core idea here is that we’re trying to find (or get close to) the global minimum of the cost function.
The matrix of gradients looks like this:
Where,
is the feature index, is the class label index, and is the specific sample/observation index. It’s
also worth noting here that in this equation is one-hot encoded and of shape (m, k).
The first term in is the gradient with respect to the cross entropy function and the second term is the gradient with respect to the L2 regularization term.
The math to get this derivative is kind of messy and outside of the scope of this tutorial. If you’re interested in the details I’m confident that several high quality blog posts on the topic exist.
The update step then looks like this:
Calculate Gradients and Update Parameters
w_gradients = -torch.mm(X.transpose(0, 1), y_one_hot - A) / X.shape[0] \
              + (2 * lambda_param * w)
b_gradients = -torch.mean(y_one_hot - A, axis=0)

w -= learning_rate * w_gradients
b -= learning_rate * b_gradients
Everything Together in One Training Loop
n_iterations = 100
learning_rate = 0.1
lambda_param = 0.01
for i in range(1, n_iterations + 1):

    Z = torch.mm(X_train, w) + b
    A = softmax_activation(Z)
    l2_regularization = torch.sum(w ** 2)
    loss = cross_entropy_loss(y_train_one_hot, A) \
           + lambda_param * l2_regularization
    w_gradients = -torch\
        .mm(X_train.transpose(0, 1), y_train_one_hot - A) / n_train \
                  + (2 * lambda_param * w)
    b_gradients = -torch.mean(y_train_one_hot - A, axis=0)

    w -= learning_rate * w_gradients
    b -= learning_rate * b_gradients

    if i == 1 or i % 25 == 0:
        print("Loss at iteration {}: {}".format(i, loss))

test_predictions = torch.argmax(
    softmax_activation(torch.mm(X_test, w) + b), axis=1
)
test_accuracy = float(sum(test_predictions == y_test)) / y_test.shape[0]
print("\nFinal Test Accuracy: {}".format(test_accuracy))

# Loss at iteration 1: 1.1546878814697266
# Loss at iteration 25: 0.7025735378265381
# Loss at iteration 50: 0.5796783566474915
# Loss at iteration 75: 0.5690209269523621
# Loss at iteration 100: 0.49405404925346375
# Loss at iteration 125: 0.47681987285614014
# Loss at iteration 150: 0.43222129344940186
# Loss at iteration 175: 0.41156941652297974
# Loss at iteration 200: 0.3894343376159668
# Loss at iteration 225: 0.37786394357681274
# Loss at iteration 250: 0.3720541298389435

# Final Test Accuracy: 0.9666666666666667
Free Differentiation with PyTorch’s Autograd
Even with relatively simple models like Logistic Regression, calculating gradients can get pretty tedious. It becomes more and more untenable as we add layers to neural networks. Luckily, PyTorch makes this incredibly easy to do automatically.
All PyTorch Tensors have a requires_grad attribute that defaults to False. If we set this property to True when
the tensor gets created, PyTorch will keep track of every computation we perform with it as a graph. Calling
backward() on any tensor that descends from the original will propagate gradients all the way back up the graph,
populating the Tensor.grad attribute for all parent tensors.
Create New Parameters
w_autograd = torch.rand((4, 3), requires_grad=True)
b_autograd = torch.rand(3, requires_grad=True)
Forward Pass Through the Model
Z = torch.mm(X, w_autograd) + b_autograd
A = softmax_activation(Z)
lambda_param = 0.01
l2_regularization = torch.sum(w_autograd ** 2)
loss = cross_entropy_loss(y_one_hot, A) \
       + lambda_param * l2_regularization
loss.backward()
So this forward pass looks just like before with the exception of that last line, loss.backard().
PyTorch Gradients vs Formula
After making the first pass, we can see that PyTorch’s gradients are identical to the ones we can generate with the original formula:
>>> w_autograd.grad
tensor([[-0.9056, -1.9042,  2.8366],
        [-0.7511, -0.8797,  1.6608],
        [ 0.0596, -1.3847,  1.3582],
        [ 0.1005, -0.4149,  0.3504]])
>>> -torch.mm(X.transpose(0, 1), y_one_hot - A) / X.shape[0] \
...     + 2 * lambda_param * w_autograd
tensor([[-0.9056, -1.9042,  2.8366],
        [-0.7511, -0.8797,  1.6608],
        [ 0.0596, -1.3847,  1.3582],
        [ 0.1005, -0.4149,  0.3504]], grad_fn=<AddBackward0>)
>>> b_autograd.grad
tensor([-0.2048, -0.3209,  0.5257])
>>> -torch.mean(y_one_hot - A, axis=0)
tensor([-0.2048, -0.3209,  0.5257], grad_fn=<NegBackward>)
Note:
- An important caveat with Autograd is that gradients will keep accumulating as a total sum every time you call
backward(). You’ll probably only ever want the results from the most recent step. That being said, it’s very crucial to zero out the gradients for every tensor after a parameter update withtensor.grad.zero_(). - As a side note, PyTorch uses the convention of ending method names with an underscore like
method_name_()for in-place changes. There’s often a corresponding side-effect-free version without an underscore likemethod_name().
Another Training Loop
n_iterations = 250
learning_rate = 0.1
lambda_param = 0.01
for i in range(1, n_iterations + 1):

    Z = torch.mm(X_train, w_autograd) + b_autograd
    A = softmax_activation(Z)
    l2_regularization = torch.sum(w_autograd ** 2)
    loss = cross_entropy_loss(y_train_one_hot, A) \
           + lambda_param * l2_regularization

    if w_autograd.grad is not None:
        w_autograd.grad.zero_()  # 1
    if b_autograd.grad is not None:
        b_autograd.grad.zero_()

    loss.backward()  # 2

    with torch.no_grad():  # 3
        w_autograd -= learning_rate * w_autograd.grad
        b_autograd -= learning_rate * b_autograd.grad

    if i == 1 or i % 25 == 0:
        print("Loss at iteration {}: {}".format(i, loss))

test_predictions = torch.argmax(
    softmax_activation(torch.mm(X_test, w_autograd) + b_autograd), axis=1
)
test_accuracy = float(sum(test_predictions == y_test)) / y_test.shape[0]
print("\nFinal Test Accuracy: {}".format(test_accuracy))

# Loss at iteration 1: 2.50476336479187
# Loss at iteration 25: 0.8208405375480652
# Loss at iteration 50: 0.6555004119873047
# Loss at iteration 75: 0.6429731845855713
# Loss at iteration 100: 0.5476508140563965
# Loss at iteration 125: 0.5351016521453857
# Loss at iteration 150: 0.4730842113494873
# Loss at iteration 175: 0.4522818326950073
# Loss at iteration 200: 0.41606056690216064
# Loss at iteration 225: 0.3964562714099884
# Loss at iteration 250: 0.38062769174575806
# Loss at iteration 275: 0.37316569685935974
# Loss at iteration 300: 0.3693510890007019

# Final Test Accuracy: 0.9666666666666667
- Zero out the gradients before calculating them again.
- Calculate upstream gradients.
- In order to not disrupt the computation graph that we rely on for gradient calculations, we need to update both
w_autogradandb_autogradinside of ano_gradcontext manager.
This training loop looks a whole lot more complicated than the first one doesn’t it? You may be asking yourself what
the point of using Autograd is if we have to deal with all of this overhead to make sure we don’t screw up PyTorch’s
gradient calculations. That’s a reasonable question. In practice you’ll probably want to use the nn package, which
we’ll go over in the next section.
Using the PyTorch Neural Network Package
As you may have guessed, the PyTorch library has a lot of additional features that will streamline the model
implementation process for us, most notably the torch.nn (neural network) package.
What TensorFlow and most other sources call layers, PyTorch calls modules. For our purposes we only need to worry
about the torch.nn.Linear module. Additionally, we’ll use the torch.nn.Sequential class to stitch our “network”
together. It functions as an ordered list of modules so you can put everything together once and then call the
sequential object on your data instead of all of the individual layers.
Model
model = torch.nn.Sequential(
    torch.nn.Linear(4, 3)
)
Using Sequential in this case is overkill and equivalent to doing model = torch.nn.Linear(4, 3). This just
illustrates how you would build a more complicated network.
Optimizer
The optimizer classes allow us to abstract out all of the parameter updates. In this case the Stochastic Gradient Descent (SGD) optimizer will do the trick.
learning_rate = 0.1
lambda_param = 0.01
optimizer = torch.optim.SGD(
    model.parameters(),
    lr=learning_rate,
    weight_decay=lambda_param
)
Loss Function
The nn package also has several loss functions for us to use, including Cross Entropy.
loss_function = torch.nn.CrossEntropyLoss()
It’s important here to note that PyTorch implements Cross Entropy Loss differently than we did initially. It expects the
un-activated logits ( matrix) instead of the softmax activations. With this input it then does a log softmax on
the logits and then returns the negative log likelihood. I believe
(from this source)
that the reason for using log softmax instead of regular softmax is to remove the risk of the exponential in the softmax
calculation causing an overflow (python NaN) to occur.
One More Training Loop
n_iterations = 250
for i in range(1, n_iterations + 1):
    Z = model(X_train)  # 1
    loss = loss_function(Z, y_train)  # 2
    optimizer.zero_grad()  # 3
    loss.backward()  # 4
    optimizer.step()  # 5

    if i == 1 or i % 25 == 0:
        print("Loss at iteration {}: {}".format(i, loss))

test_predictions = torch.argmax(
    torch.softmax(model(X_test), 1), axis=1  # 6
)
test_accuracy = float(sum(test_predictions == y_test)) / y_test.shape[0]
print("\nFinal Test Accuracy: {}".format(test_accuracy))

# Loss at iteration 1: 0.9752714037895203
# Loss at iteration 25: 0.5917924046516418
# Loss at iteration 50: 0.5611095428466797
# Loss at iteration 75: 0.4597735106945038
# Loss at iteration 100: 0.4310804307460785
# Loss at iteration 125: 0.3661951720714569
# Loss at iteration 150: 0.3313466012477875
# Loss at iteration 175: 0.29825714230537415
# Loss at iteration 200: 0.2813898026943207
# Loss at iteration 225: 0.27167195081710815
# Loss at iteration 250: 0.26376885175704956

# Final Test Accuracy: 0.9666666666666667
Let’s go over what just happened:
- Called the sequential
modelon our dataset, which performed all of our module operations in the order that we added them when we instantiated it (again, in this case just the oneLinearmodule). - Assessed our model’s performance by calculating the loss.
- Zeroed out all of the parameter gradients.
- Calculated gradients again by calling
backwardon thelosstensor. Note once more that this ordering is very important. Thezero_gradcall can happen anywhere prior to thebackwardcall. - Updated model parameters by simply calling
stepon the optimizer. - Note here that we can still call softmax on the logits (
Z) to get probabilities just like before even though we didn’t explicitly train on the resulting activations.